
If you are using Timesheets.com with QuickBooks for the first time we encourage you to contact us for help with getting your integration set up!
Table of Contents
- System Requirements
- Setting Up Employees in QuickBooks
- Setting Up the Special Case for Importing Time to Vendors
- Setting Up Customers and Jobs in QuickBooks
- Setting Up Service Items in QuickBooks
- Setting Up Employees in Timesheets.com
- Setting Up Customers, Projects, and Account Codes in Timesheets.com
- Allocating Time Directly to Customers without Jobs
- Setting Up the Timesheets.com Importer
- Exporting Time
- Data Map
1. System Requirements
- Administrative access to QuickBooks
- Administrative access to Windows (QuickBooks does not support Mac)
- Administrative access to Timesheets.com
- Ability to access QuickBooks in Single User Mode
Installing Import Software On Your PC
- In Timesheets.com, click the gear wheel icon in the upper-right, then click Company Settings. Navigate to the Data Export tab, and click the QuickBooks Desktop Importer link.
- Click the Download QuickBooks Import Setup File link.
- There are two files inside the compressed file you will need to install:
- QBFC11 file
- Timesheets Setup file
- Run and install both files with default settings. Note: You must have the QuickBooks company file open in QuickBooks while you complete the installations of both files.
- When complete, you should see a new icon on your desktop that looks like the icon below. This is the importer app and you will use it when you’re ready to import your data.
2. Setting Up Employees in QuickBooks
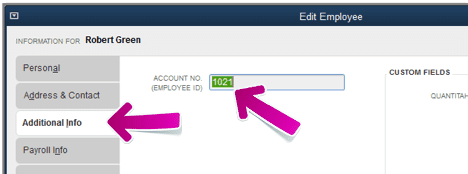
Each employee in QuickBooks and Timesheets.com must have the same employee number. Navigate to the Employee Center. Edit each employee and select the Additional Info tab. Locate the Account Number and enter a unique number for the employee in that field.
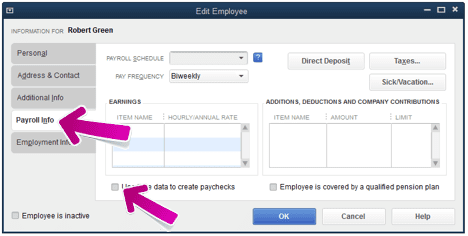
Next, select the Payroll Info tab for each user and uncheck the box next to Use time data to create paychecks.
3. Setting Up the Special Case for Importing Time to Vendors
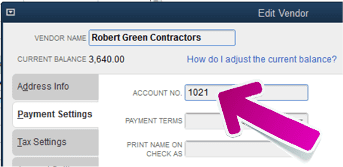
To import project time to a vendor (instead of an employee), edit the vendor and save a unique number to the Payment Settings tab. You will later assign the same number to the user in Timesheets.com. Note that if you have a vendor and an employee with the same account number, then time will be written to the employee’s timesheet in QuickBooks, not the vendor’s timesheet.
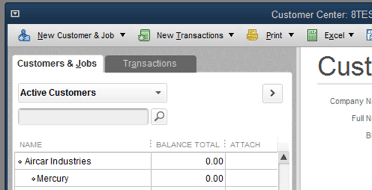
4. Setting Up Customers and Jobs in QuickBooks
Customers in Timesheets.com import to QuickBooks as Customers or Clients. Projects import to QuickBooks as Jobs. In the example below, the customer is “Aircar Industries” and the project (or Job in QuickBooks) is “Mercury.”
You may enter Customers and Jobs into both Timesheets.com and QuickBooks directly, or you can create them initially in Timesheets.com and have Timesheets.com create them for you in QuickBooks during the import process. If customers and jobs are not activated, they can be reactivated automatically during the import.
Note that the spelling and capitalization of all list items (Customers, Projects, and Account Codes) in Timesheets.com and QuickBooks must match exactly, or duplicates in QuickBooks may be created inadvertently during the import process. Also, note that list items can be up to 41 characters (including blank spaces). This is a limitation of QuickBooks, not Timesheets.com.
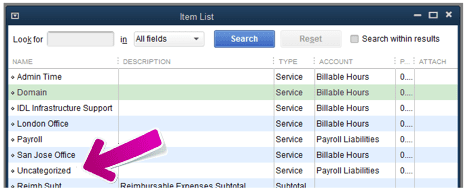
5. Setting Up Service Items in QuickBooks
If you have Service Items in QuickBooks, you’ll need to copy them to the Account Codes list in Timesheets.com for use in tracking time and importing. If you don’t use Service Items you’ll still need at least one Account Code for the import. The default Account Code in Timesheets.com is titled “Uncategorized,” but you can rename it to match an existing QuickBooks Service Item if desired.
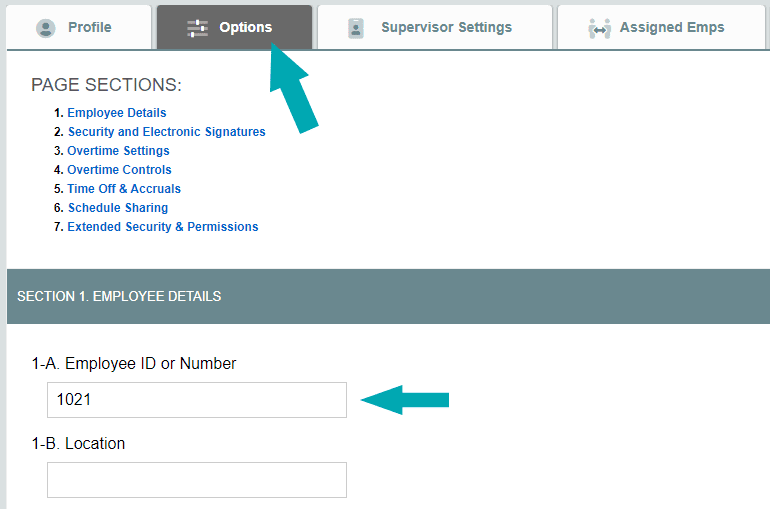
6. Setting Up Employees in Timesheets.com
In Timesheets.com, navigate to each employee’s settings by clicking the ![]() gear wheel icon to the left of their (name from the dashboard). Then, navigate to the Details section of their Options tab and enter the same number from the QuickBooks setup into setting 1 so that an employee or vendor in QuickBooks has the same number in Timesheets.com. This ensures that time is imported into the proper timesheet in QuickBooks.
gear wheel icon to the left of their (name from the dashboard). Then, navigate to the Details section of their Options tab and enter the same number from the QuickBooks setup into setting 1 so that an employee or vendor in QuickBooks has the same number in Timesheets.com. This ensures that time is imported into the proper timesheet in QuickBooks.
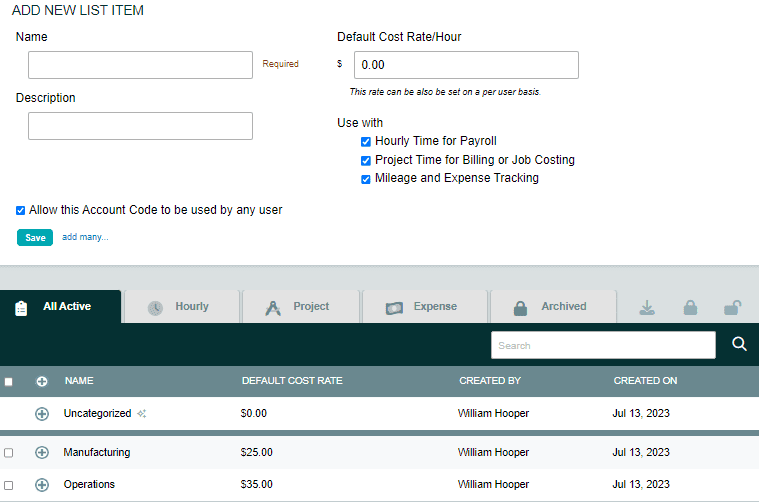
7. Setting Up Customers, Projects and Account Codes in Timesheets.com
Customers, Projects, and Account codes in Timesheets.com are all set up via their respective lists accessed from the left menu. Add the list items as they appear in your QuickBooks file, paying attention to exact spelling and capitalization. We recommend copying and pasting the values if possible. List items can also be imported using an import file if there is a large number of them. In the example image below, you would add an Account Code (Service Item in QuickBooks) by typing in the name of the code and clicking the Save button. The new item will appear in the list below.
8. Allocating Time Directly to Customers without Jobs
If you have customers but do not use jobs, you can import your data by renaming the default project in Timesheets.com to “null”. When the importer sees the value of “null” for the project, it ignores it and allocates the time worked directly to the customer in QuickBooks with no job.
9. Setting Up the Timesheets.com Importer
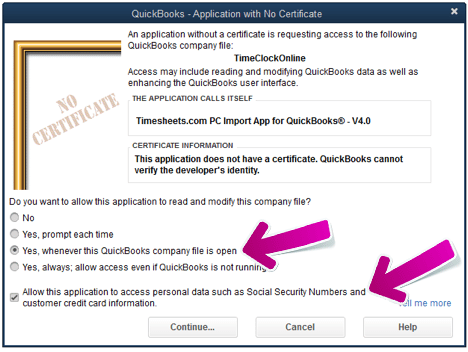
To set up the importer, put QuickBooks in Single User Mode. Double-click the desktop icon installed in Step 1 to start the importer. Running the importer for the first time will prompt QuickBooks to open a dialog box asking for permission to install the software.
- Select the 3rd option, Yes, whenever QuickBooks company file is open.
- Check the box next to Allow this application to access personal data… (This option is necessary because the payroll module contains personal information.)
- Click Continue and follow the prompts to complete the process.
You are now ready to import your data into QuickBooks.
10. Exporting Time
To export time from Timesheets.com, click Reports in the left menu, then click Customizable Report under Project Time Tracking. From there, select the form parameters, including dates and other filters.
Tips
- If you wish to export notes with your time records, be sure to check the box next to Include Work Notes When Downloading. Otherwise, your data will export without work notes.
- If you’re archiving project time after export, be sure to uncheck the box next to Include Archived Time. This will help to avoid the possibility of re-exporting time that has already been imported into QuickBooks.
- Once you successfully import your time into QuickBooks, we strongly suggest archiving the time in Timesheets.com. This step helps prevent creating duplicate time entries in QuickBooks by accidentally re-importing the same time records twice.
- When importing billable time to QuickBooks, the Account Code must be imported as a Service Item since time marked as billable requires a service item. QuickBooks will not accept an import of billable time if the Account Code is set to translate to something other than Service Item.
- When importing time where the Account Code is translated to Class, there are two Preferences settings that must be set properly in QuickBooks.
- In the Accounting section on the Company Preferences tab, the Class section must be enabled. Check the box next to Use class tracking…
- In the Payroll & Employees section on the Company Preferences tab, the Job Costing, Class and Item boxes must be checked and classes must be assigned per Earnings item. Without this setting, the Classes column will not display on the weekly timesheet.
11. Data Map
| In Timesheets.com | In QuickBooks Desktop |
| Customer | Customer or Client |
| Project | Job or Null |
| Account Code | Options: Service Item Payroll Item Class Sub-Job |